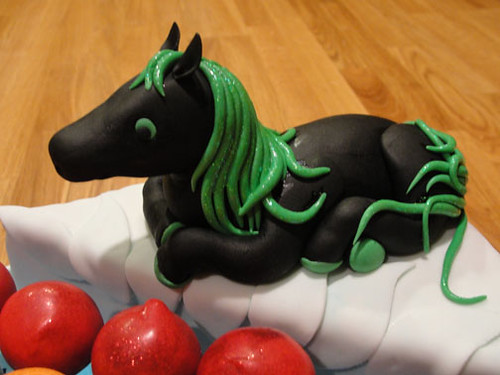
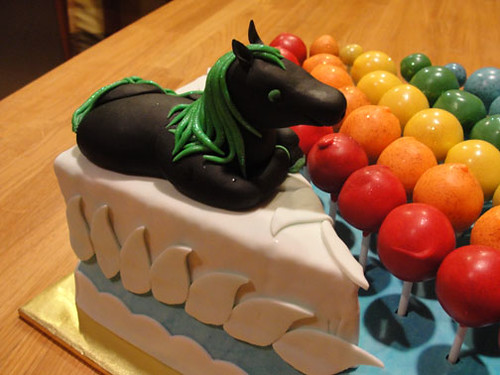
At the beginning this month, I was asked to create one most colorful cakes ever. . . a rainbow cake! But this was not just a cake, it was a cake with a spectrum of shimmering cake pops and a fantasy horse! This cake was for Thu's eldest daughter who was turning 4, and her niece who was going to be 6. Her daughter, Kylee, has a love for black horses, and Bethany loves anything shimmery and colorful. This cake was a mash up of the girls fave things.
Thu requested cake pops, and they were perfect for the concept of this cake. They would make up a bright and shimmery rainbow, and a lovely black horse would sit nearby on a cloud pedestal. The base of this cake was a delicious marble, and the cake pops were round balls of yummy vanilla and moist chocolate cake. This cake required some careful planning to achieve the perfect arch of colors. I created a template in Adobe Illustrator with a 9 x 13 cake as my guide. This allowed me to figure out how many cake pops in a certain color was required to fill the space, and at what size I should make my cake pops to fit properly. Once I had my template, it was on to creating my little black horse. I have to admit, it took me two tries to create a horse I was happy with. I've never made a horse like this before, and I had to steer away from it looking too much like a pony. . . Okay, so I was kinda worried. My first horse started to look resemble a mix between a donkey and a cow. It was not what I going for. I finally realized that my shaping and positioning of the limbs that was affecting the overall look. A horse has a very defined muscle structure, and this guy looked like it hadn't hit the gym in years! Time for a do-over and some photo inspiration, and the horse was looking so much better. Thin ropes of green for the horse's mane brought this little guy to life. Kylee requested glitter in the it's mane and that is what she gets. After the hair was set in place with gum glue, some edible glitter was lightly brushed on foe some shimmer.
Two batches of cake were made for the cake pops, one in vanilla and the other in chocolate. The cakes were then crumbled and mixed with some butter cream. The key is to not add too much at a time, and not make the mixture too moist. You don't want the cake balls to fall apart when you try to coat them. Using the template I created, I shaped the cake balls to the correct size and placed them in the fridge to firm up. I left them in for a couple hours before attempting to coat them. Working with 4 at a time, I dipped the end of a lollipop stick into the melted candy coating and inserted it halfway into the cake balls. In one continuous motion, I dipped the cake pops into the candy coating in the colors needed. I remove excess candy coating from the covered cake pops by tapping on the inside of my wrist after dipping them in. Tap the same wrist that is holding onto the cake pops. This helps lessen the force to the cake end, and lessen the chance of them falling off the stick. After they were coated, matching disco dust was sprinkled on to add a little bling.
The base cake was torted and filled with buttercream, then crumb coated with more of the same yummy stuff. Since we had a rainbow, clouds and a blue sky just seemed natural as the backdrop for the cake pops. I kneaded white and blue fondant together, but not completely intergrated. This creates swirls of blue and white, mimicking clouds floating in sky. This was used to cover the base layer of cake, then smoothed to perfection. Using my template ( so glad I made this thing), I marked the location of each cake pop. This ensured that they fit perfectly, and the arch looked smooth. A pedestal made from cereal treat was covered in white fondant, and placed in the upper corner. This was the perfect platform for my little horse to view the lovely rainbow from.
A new twist to the phrase, "Taste the rainbow!".
Subscribe to:
Post Comments (Atom)


Post a Comment
I would love to hear what you think!