A Coach Cake For Bridget!
June 29, 2011
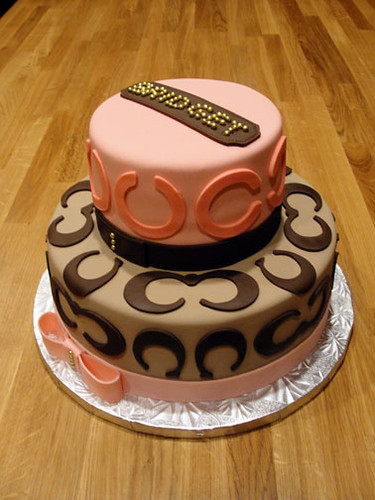
My coworker has always said, "I'm going to find an event to have you make a cake!". Well, she finally found an event, and approached me almost a month and a half ahead of time. Her niece, Bridget, was graduating from junior high and she wanted a cake for her party. At first, we were thinking about designing a cake around Bridget's passion for competitive cheer leading. However, the color combination and uniform pattern made me think of bad 80's memories. After steering away from that concept, we designed a cake around her other passion...Coach!

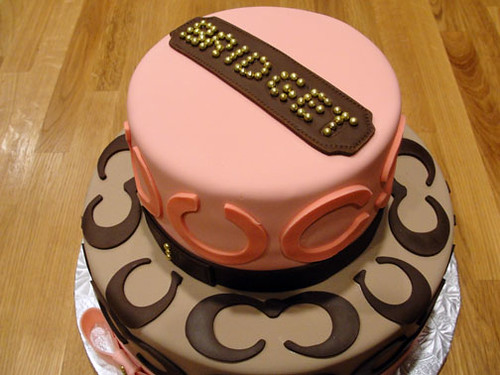
The cake consisted of a 10" of yellow cake filled with Nutella, and a 6" of chocolate filled with Nutella. The bottom level was covered in a light brown fondant and embellished with the signature Coach monogram pattern in a dark chocolate fondant. The top layer was covered in a light pink vanilla fondant and embellished with a more modern take on the Coach monogram. All the monograms were created in Illustrator and cut out on an electronic cutter, which has been a great investment so far! Contrasting ribbons of fondant were wrapped around the bottom of each layer, and finished off with a bow or placket with gold dragee detailing. To complete the cake and add a personalized touch, I created a logo plate out of dark chocolate fondant and spelled out Bridget's name out of gold dragees! Enjoy!

The cake consisted of a 10" of yellow cake filled with Nutella, and a 6" of chocolate filled with Nutella. The bottom level was covered in a light brown fondant and embellished with the signature Coach monogram pattern in a dark chocolate fondant. The top layer was covered in a light pink vanilla fondant and embellished with a more modern take on the Coach monogram. All the monograms were created in Illustrator and cut out on an electronic cutter, which has been a great investment so far! Contrasting ribbons of fondant were wrapped around the bottom of each layer, and finished off with a bow or placket with gold dragee detailing. To complete the cake and add a personalized touch, I created a logo plate out of dark chocolate fondant and spelled out Bridget's name out of gold dragees! Enjoy!
Jazz up a simple cake with some candy!
June 27, 2011
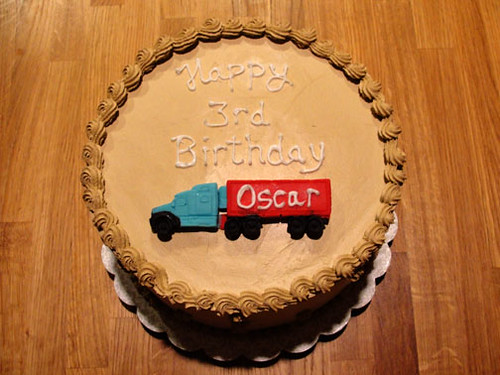
Not all cakes have to be over the top to be special. Take this cake for instance. This cake is for a little boy named, Oscar, and his Godmother had ask me to make a yellow cake with chocolate whipped cream. And of course, the theme was all about semi-trucks. Little boys just become interested in the most random things. The question was how to incorporate a semi-truck... should I use a transfer, edible image, etc. I love working with gumpaste, but I was worried about the truck just becoming a soft mush on the whipped cream, or the colors bleeding into it. Then I thought about chocolate, but the rising heat worried me. After about an hour of talking to myself in the kitchen, I finally figured it out... good ol' candy melts!
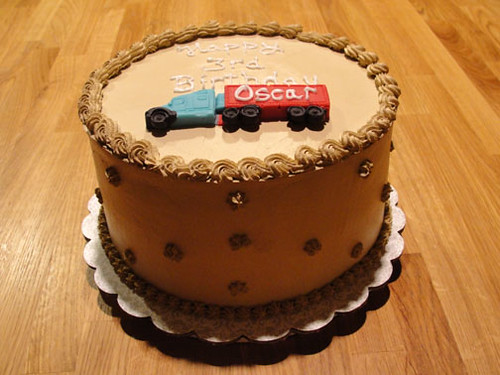
I baked two 8 inch rounds and torted them after cooling for several hours. I made some chocolate whipped cream and filled in between each layer. I placed the cake back in the cooler for few minutes to settle and covered the entire cake with a Wilton icing tip. I smoothed out the top with a large spatula, and ran a bench scraper along the sides for a super smooth finish. I piped on the border using a star tip and added rosettes to the side of the cake. Now for the fun part! I melted candy melts in the microwave and used a squeeze bottle to fill the cavities of a silicone mold. I filled in the tires first and then the rest to prevent the colors from bleeding into each other. The mold was then placed in the cooler for 15 minutes to set. Now, I have to admit, this is the nerve wrecking part... getting the candy out of the mold. The wheels are so small and delicate that one wrong move and my wheels will break off. I slowly pulled away at all the edges until I had loosen up the truck and then popped it out of the mold in one piece. This colorful ( and yummy ) element was then placed on the cake. I finished off the cake with a message and piped Oscar's name on the semi-truck's trailer.
Remember, simple doesn't have to boring. Candy making tools are a great way to turn any cake into awesome! Enjoy!
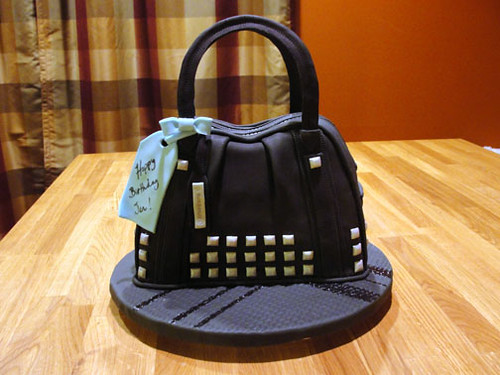
Last month, my friend called me about her cousin who had an emergency... a cake emergency! Ada needed a cake for her client, and time was fast approaching. Ada works for fashion icon Burberry, and this could not be less than that. Her client was celebrating her birthday, and they wanted to surprise her with a delicious purse cake. Ada sent me a couple pictures of purses, and we weighed out our options to figure which one had a better shape and size for the cake. After a few messages, we were able to narrow it down to her client's fave purse, the Prorsum Knight!
The cake begun as a 1/4 sheet vanilla cake that was cut into 4ths, and stacked between layers of vanilla buttercream. Using a template that I created on the computer, I marked the areas that I would carve with toothpicks, tracing the outside edge of my paper template. I slowly carved away thin sections for a smooth tapered shape. I've learned that the trick to carving a cake is a good serrated knife, and a chilled cake. This prevents the cake from just falling apart, and I'm not left with a pile of crumbs. The entire cake was then crumb coated with buttercream for a smoother finish.
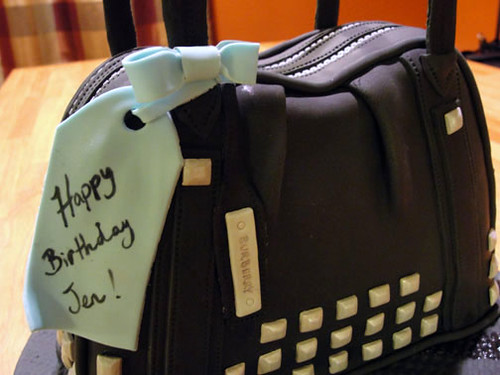
The next two steps were a bit tricky, and took some patience. I had to recreate the pleating in the leather to resemble the real purse. I rolled out the black fondant and cut out a piece slightly larger than the front and back of the purse. I draped the fondant down the side, and created a pleated fold with my fingers just before adhering it to cake. Then the hardest part was to create the zipper and the zipper opening. I was lucky to find a zipper mold, but that didn't solve the problem I faced about incorporating it to the top of the purse cake. I didn't want to just plop it on top... I wanted a nice clean finished look as if it was stitched under the leather. I realized that I would have to work fast in order to get my plan to work. I formed two fondant zippers with help of the silicone mold, and brushed on silver luster dust for a metallic sheen. I then quickly rolled out a strip of black fondant and slit in two openings the size of the zippers. I positioned the strip over the top of the zipper and adhered it with a touch of gum glue. This gave the appearance that the zippers were set into the purse and behind the leather. The result was perfect! I then carefully drapped this over the top of the purse cake and smoothed it down to follow the curvy top. Using an exacto knife, I carefully trimmed off the excess. A rope of black fondant finished off the seams, and a quilting wheel helped to add the details of the stitching.
Next up was the handles, and I didn't want handles that just laid on top. I wanted to add some structure so I opted for 30 gauge wrapped floral wire that I shaped according to my template. I rolled out a skinny strip of black fondant and folded it over the wire and attached it with some gum glue. Then I traced along the edges with the quilting wheel for a stitching affect. The ends were then inserted into the cake and trimmed with a triangular piece with more stitching. The Prorsum Knight could not be complete without the studs that ran along the bottom. I created the studs from small balls of grey fondant, flattening the sides with a knife, and covered them with more silver luster dust. Positioning them on the cake took a bit of planning and a ruler. It would be awful to have studs that were crooked. Each one was attached with a dot of piping gel. For final details, I added the distinct key lock, and a silver Burberry tag. A contrasting blue gift tag personalized the purse cake. A cake this fabulous needed a matching base, so I covered a half inch foil drum with black fondant and imprinted a weaving pattern. I then painted on a their signature black on black plaid pattern with clear piping gel. And voila! No girl should ever live without a Burberry....cake!
Subscribe to:
Posts (Atom)




Social Icons