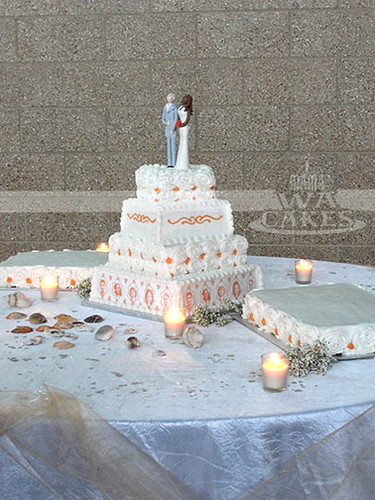
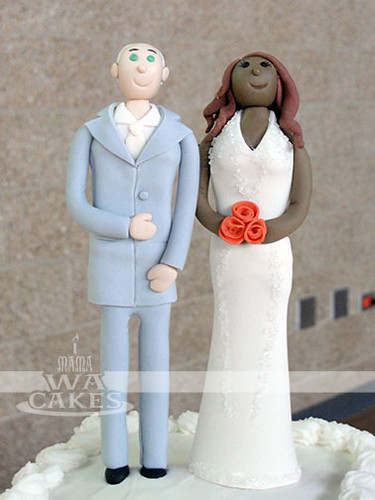
Last month, I had the opportunity to create a wonderful and meaningful cake for my co-worker and his fiancée. The cake was simple, yet elegant, with a touch of fun. When it came down to the decoration, I had free reign as long as the cake was offset and that their children were incorporated in the design. The offset cake symbolized their journey together, and their children were, of course, an important part of their lives. They were two individual families that will be joined as one on that special day.
My preparation for this cake began a week prior to the wedding when I sculpted the bride and groom cake toppers. With their photos in hand, I began shaping the couple out of tinted gumpaste starting with the legs. The legs were created first and allowed to dry a few days before I built on the torso, neck, and then the head and face. I made sure that each added part were almost dried before moving on. The added weight would make the toppers slouch if the parts were still pliable. Who would want a slouchy bride and groom on their cake?! Once the body was completed, I added on their suit and wedding dress. I rolled out thin sheets of gumpaste, and cut them out as if I would with real clothing, piecing on the back and seamed with the front. The wedding dress was cut out as if it were an apron and wrapped around from the front to the back to form a halter style. Sugar sprinkles were then attached with simple syrup to represent the sequins on her dress. Once I was happy with the clothing, arms were added and attached in position. The final step is also an important step. No matter how general or unlike the real person the toppers may be, the perfect hair makes them recognizable and personal. I rolled out gumpaste that matched their hair colors, and pieced them together on their heads. I used different veining tools to give them movement, texture, and curls. Now they look just like them!
 Toppers done, and it's time for the cake... lots of cake. The cake was made up of 4 offset square tiers, rotated to the left until the corners almost met the edge of the one below. Each tier consisted of one layer of chocolate and one layer of vanilla cake, sandwiched around a layer of rich buttercream. These were then all iced in buttercream, alternating a smooth finish with one covered in large roses. I love covering whole cakes in large buttercream star tip roses. It is a simple technique that looks so dramatic. To incorporate the kids into the design, but keeping with the elegance of the cake, I created printed edible images of the kids in the coral accent color. I edited the images in Photoshop to remove the background, and then laid them out in Illustrator with decorative borders to compliment the overall design of the cake. I wanted their images to be part of the cake, not take away from elegance, or take away from the toppers. The edible images were attached to the buttercream on the bottom tier before it crusted over. I then pipes scallops along the edges. I finished off the cake with dots of coral in between the roses, and a simple scroll to tie in their wedding colors. The same treatment was duplicated on two sheet cakes that I also baked for extra servings. That is a great way to feed a large number of guest without having to pay for a super huge wedding cake.
Congrats to the S and N!


Post a Comment
I would love to hear what you think!