Mark V Helmet Wedding Cake
February 5, 2014
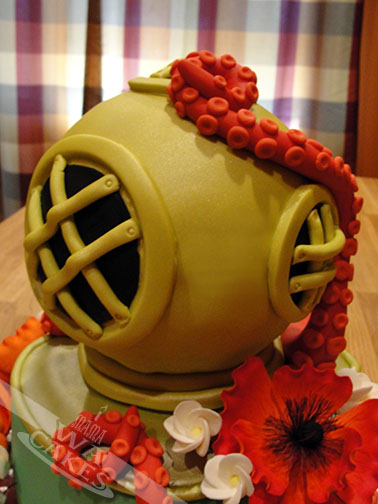
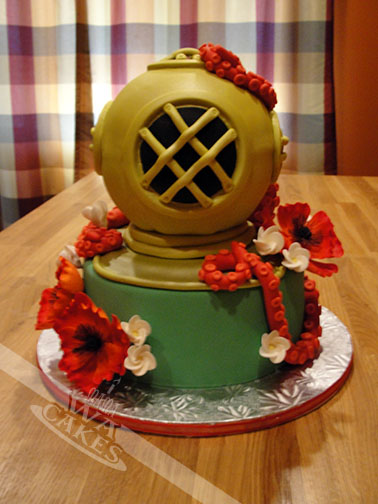
I hope everyone had a wonderful holiday, and a great start to a new year! My past year has been very busy, and time just really flew by. It's been almost 5 months since my last post! As I was going back through my photos, I realized that there was one cake that I never posted about and was definitely worth sharing. I learned so much from designing it, and it forced me to tackle the one thing I dread... covering a sphere with fondant. The idea scares me, and on top that, this cake had to look like an awesome Mark V diving helmet. Chelsey wanted her wedding cake to be a surprise for her husband-to-be who is a professional deep sea diver.
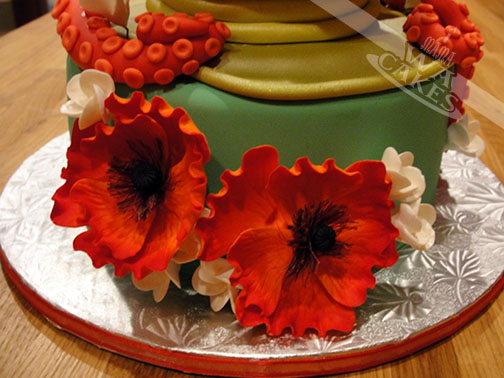
To start off with this design, I created some beautiful red poppies and ivory frangipani out of gumpaste a week prior. I let them dry completely before assembly, and always make extra since accidents can happen. A great tutorial on making gumpaste poppies can be found here. This is was very helpful for me, but of course I used a slightly different cutter. Once they were dry, I used luster dust to add some natural color gradations. The great thing about making gumpaste flowers is that they can be made weeks ahead of time and stored until you're ready to use them.
Next, it was time to dive into the cake, no pun intended :) I knew the dimensions of the cake so I baked two 8" rounds of red velvet, and the same flavor in a 6" Wilton Sports Ball pan. It comes in two hemispheres that are filled, baked, and then stacked to make a 6" ball. The baking seemed easy enough, but the assembly of the different layers had me thinking. My first attempt at the helmet layers resulted in a very squashed bottom half. The weight of the buttercream and fondant would need some extra support. That was when I ditched the bottom cake half and opted for a 6" styrofoam hemisphere. This was perfect! Rule of thumb when dealing with styrofoam... don't let it touch the cake! I gave it a small flat bottom with a knife so it wouldn't roll, and covered it in plastic wrap. A 6" cake board was then placed on top, held in place with a dollop of buttercream. I then placed the top half of the cake ball on it. The sphere was crumb coated and ready for fondant...DUM DUM DUM DUM! You could only imagine that I'm very nervous by now. I gathered myself...took some deep breathes, and proceeded as I knew how. Some people would cover one half, and flip it over to do the other. I wanted no seams so I covered it all in one shot. I set the cake ball on a plastic tub that was smaller in diameter to give me a nice pedestal to work with. This allows me to get the fondant as close to the bottom without having a table top being in the way. I rolled out a light yellow fondant and laid it over my cake ball. Working my way from top to bottom, I rubbing it down inch by inch, lifting any pleats to get it smooth. I continued until I got all the way to the bottom and trimmed away any excess. Phew! The hardest part was over.
 The next step was to prep the bottom layers for the covered ball. I stacked the (2) 8 inch rounds, filled with cream cheese frosting, and crumb coated them in buttercream. This layer then received a smooth blanket of kelly green fondant. Support for the helmet layer was very crucial at this point. I trimmed down a 6" cake board to fit below the flat bottom of the styrofoam part, about 2 inch diameter. I located the center of the cake, and inserted 4 wooden dowels within the size of the mini cake board, and on top of that, I piped a couple dots buttercream. This will hold the cake board in place once it's on the wooden dowels and on the cake below. To create a more finished and cohesive look, I rolled out a rectangular piece of yellow fondant and laid it over the mini cake board and cake to create the collar of the helmet. I gently rubbed down on the fondant along the edge of the cake board so I could locate it. I wanted to make sure that the cake stayed centered. The helmet layer was gently lifted and positioned over the cake board and secure in place with a dollop of royal icing. You can also insert a long dowel through the whole cake to really hold it in place at this point. I know it's a lot to take in, but I hope my illustration to the left would help :)

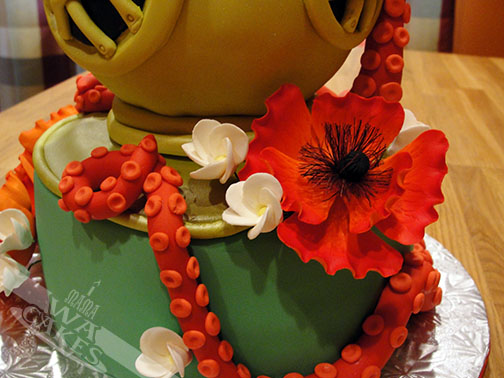
 Once the cake was fully assembled, it was time to finish decorating! I rolled out ropes of fondant and created the signature windows of the Mark V, and trimmed off the edges of the collar. I then airbrushed the yellow parts of helmet with a gold shimmer for a metallic look. Another key element to the cake were the octopus tentacles that look like they are ready to envelop the Mark V. To create these, I rolled out long tapered ropes of red fondant and adhered them to the cake. I started at the base of the collar on the back side, and wrapped the tentacles around the helmet as realistic as I could. I then made small balls of light red fondant that I flattened with a ball tool for the suckers. I used a small detail brush and water to attach them to the tentacles. This made them so life-like! For the final touch, I inserted the gumpaste flowers to soften it up for the bride.
To start off with this design, I created some beautiful red poppies and ivory frangipani out of gumpaste a week prior. I let them dry completely before assembly, and always make extra since accidents can happen. A great tutorial on making gumpaste poppies can be found here. This is was very helpful for me, but of course I used a slightly different cutter. Once they were dry, I used luster dust to add some natural color gradations. The great thing about making gumpaste flowers is that they can be made weeks ahead of time and stored until you're ready to use them.
Next, it was time to dive into the cake, no pun intended :) I knew the dimensions of the cake so I baked two 8" rounds of red velvet, and the same flavor in a 6" Wilton Sports Ball pan. It comes in two hemispheres that are filled, baked, and then stacked to make a 6" ball. The baking seemed easy enough, but the assembly of the different layers had me thinking. My first attempt at the helmet layers resulted in a very squashed bottom half. The weight of the buttercream and fondant would need some extra support. That was when I ditched the bottom cake half and opted for a 6" styrofoam hemisphere. This was perfect! Rule of thumb when dealing with styrofoam... don't let it touch the cake! I gave it a small flat bottom with a knife so it wouldn't roll, and covered it in plastic wrap. A 6" cake board was then placed on top, held in place with a dollop of buttercream. I then placed the top half of the cake ball on it. The sphere was crumb coated and ready for fondant...DUM DUM DUM DUM! You could only imagine that I'm very nervous by now. I gathered myself...took some deep breathes, and proceeded as I knew how. Some people would cover one half, and flip it over to do the other. I wanted no seams so I covered it all in one shot. I set the cake ball on a plastic tub that was smaller in diameter to give me a nice pedestal to work with. This allows me to get the fondant as close to the bottom without having a table top being in the way. I rolled out a light yellow fondant and laid it over my cake ball. Working my way from top to bottom, I rubbing it down inch by inch, lifting any pleats to get it smooth. I continued until I got all the way to the bottom and trimmed away any excess. Phew! The hardest part was over.
 The next step was to prep the bottom layers for the covered ball. I stacked the (2) 8 inch rounds, filled with cream cheese frosting, and crumb coated them in buttercream. This layer then received a smooth blanket of kelly green fondant. Support for the helmet layer was very crucial at this point. I trimmed down a 6" cake board to fit below the flat bottom of the styrofoam part, about 2 inch diameter. I located the center of the cake, and inserted 4 wooden dowels within the size of the mini cake board, and on top of that, I piped a couple dots buttercream. This will hold the cake board in place once it's on the wooden dowels and on the cake below. To create a more finished and cohesive look, I rolled out a rectangular piece of yellow fondant and laid it over the mini cake board and cake to create the collar of the helmet. I gently rubbed down on the fondant along the edge of the cake board so I could locate it. I wanted to make sure that the cake stayed centered. The helmet layer was gently lifted and positioned over the cake board and secure in place with a dollop of royal icing. You can also insert a long dowel through the whole cake to really hold it in place at this point. I know it's a lot to take in, but I hope my illustration to the left would help :)
 Once the cake was fully assembled, it was time to finish decorating! I rolled out ropes of fondant and created the signature windows of the Mark V, and trimmed off the edges of the collar. I then airbrushed the yellow parts of helmet with a gold shimmer for a metallic look. Another key element to the cake were the octopus tentacles that look like they are ready to envelop the Mark V. To create these, I rolled out long tapered ropes of red fondant and adhered them to the cake. I started at the base of the collar on the back side, and wrapped the tentacles around the helmet as realistic as I could. I then made small balls of light red fondant that I flattened with a ball tool for the suckers. I used a small detail brush and water to attach them to the tentacles. This made them so life-like! For the final touch, I inserted the gumpaste flowers to soften it up for the bride.
Subscribe to:
Posts (Atom)


Social Icons