Six Months Later... So Many Cakes!
June 15, 2015
Long time no blog! I can't believe it's been six months since my last post, and I have so much to share! The last few months have been a little crazy for me... trying to balance a 9-5, my son's school schedule, a very active toddler, and my baking addiction has pulled me away from updating my blog. Don't fret! I have plenty to share, and I apologize ahead for this lengthy post. The last few cakes I made were for my friends, and friends of family. They were fun to design, a pleasure to bake, but most of all, it was exciting to try out new techniques and ideas.
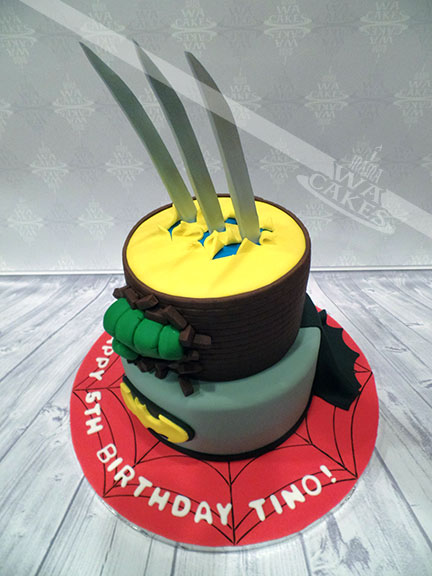 I have made plenty of super hero cakes in the past, but none of them were quite like this. This cake contained several multi-dimensional work. I had to think about my base/background, and what would work in the foreground. On top of that, I had to combine elements of 4 different characters in a cohesive design. After a few sketches, I decided on Spider-man's web as the base. I covered the cake drum in red fondant, and drew on the web with a black edible marker. The web created the perfect foundation for rest of the cake... it appears as though the cake is supported by the web. Next tier was all about Batman. I covered the cake in the classic gray with a free-flowing black cape hanging off the back. The recognizable Bat logo was given depth with a black oval and the yellow bat overlay. The next tier was my fave to create. I textured the side to mimic a brick wall, and shaped Hulk's fist out of a thick, flattened green oval. I cut slits into it to mimic the fingers, and rolled them in as if making a fist. I then used a veining tool and created the creases around the knuckles. Individual brick pieces were then cut and attached around the fist to simulate Hulk breaking through the wall. The very top of the cake was covered with a bright blue and then a layer of yellow. I made several small cuts into the yellow layer only and folded it back to look like shredded fabric. The signature Wolverine claws were shaped out of gumpaste, and left to dry a week prior to baking this cake. Using an air brush, I covered the claws in a edible metallic silver sheen, and created darker shadows with a slate blue. These were then inserted into the cake in the three areas once the color had dried. Doesn't it look like Wolverine clawing his way out?!
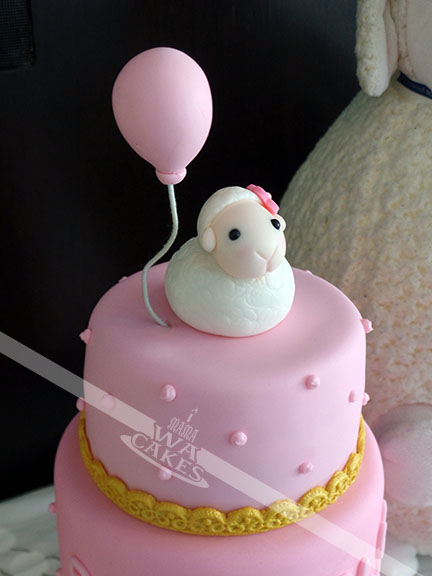 There is nothing cuter in this world than a baby lamb cake. Except for a pink ombre, baby lamb cake! The gradation of colors gave this simple and chic cake depth, and leads your eyes up the tall cake to where the little guy sits. I mixed three different shades of pink, covering the bottom cake in the darkest, and the lightest on top. All three cakes were stacked to created an overall height of 12 inches. Each cake was then accented with molded fondant lace that I covered with gold luster dust. With same medium shade, I cut out the message for the second tier to not break up the ombre effect. I then piped little swiss dots on the rest of the cake. The cake was so pretty, but no baby shower cake can be complete without an extra dose of cuteness. The star of cake was the fondant lamb and gumpaste balloon topper... this has got to the most adorable thing I've made so far! She was shaped out of two balls of fondant... the body was an oval and the head was more of a teardrop. For the fleece, I used a large round tip and made overlapping impressions all over the body. This method was simple and very effective. I used the same method for the small cap of fleece on her head, and accented it with a small pink flower. The ears were small teardrops of fondant, while the eyes were small black sugar pearls. I used a veining tool for her nose and mouth, and completed the look with a touch of pink luster dust for some rosiness. What do you think?!
Drum Cake For Jesael
This was my first drum cake, and I used a photo of Jesael's drum set as reference. I stacked two 8 inch rounds and covered it in white fondant. I then wrapped a long strip around the side of the cake, making sure it was 1/8 inch taller to create the rim. I dusted the top center of the cake with ivory petal dust to mimic the wear of the real drum. To make it more realistic, I used a paper towel and wiped away some luster dust in long straight strokes to mimic the dragging of a drum stick. I then combined several shades of brown into a swirled pattern, and shaped the drumsticks. This made them look like real warm-colored wood. I finished off the cake with silver accents such as the oval lugs, rims, name plate, and the tension rods were lollipop sticks covered in luster dust. This looked so good that some of the guest tried to play it when it was on the table!
Super Hero Mash-Up
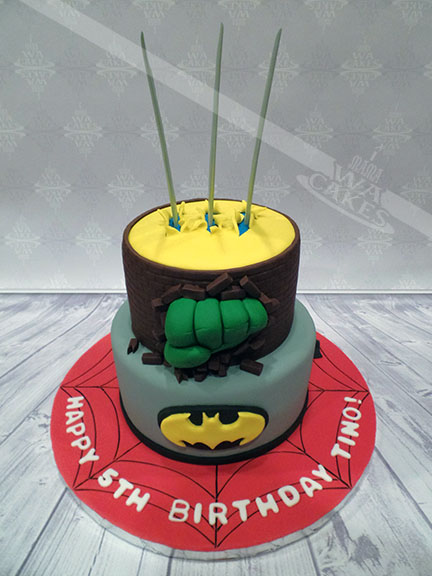
 I have made plenty of super hero cakes in the past, but none of them were quite like this. This cake contained several multi-dimensional work. I had to think about my base/background, and what would work in the foreground. On top of that, I had to combine elements of 4 different characters in a cohesive design. After a few sketches, I decided on Spider-man's web as the base. I covered the cake drum in red fondant, and drew on the web with a black edible marker. The web created the perfect foundation for rest of the cake... it appears as though the cake is supported by the web. Next tier was all about Batman. I covered the cake in the classic gray with a free-flowing black cape hanging off the back. The recognizable Bat logo was given depth with a black oval and the yellow bat overlay. The next tier was my fave to create. I textured the side to mimic a brick wall, and shaped Hulk's fist out of a thick, flattened green oval. I cut slits into it to mimic the fingers, and rolled them in as if making a fist. I then used a veining tool and created the creases around the knuckles. Individual brick pieces were then cut and attached around the fist to simulate Hulk breaking through the wall. The very top of the cake was covered with a bright blue and then a layer of yellow. I made several small cuts into the yellow layer only and folded it back to look like shredded fabric. The signature Wolverine claws were shaped out of gumpaste, and left to dry a week prior to baking this cake. Using an air brush, I covered the claws in a edible metallic silver sheen, and created darker shadows with a slate blue. These were then inserted into the cake in the three areas once the color had dried. Doesn't it look like Wolverine clawing his way out?!
Sweet Lamb Cake
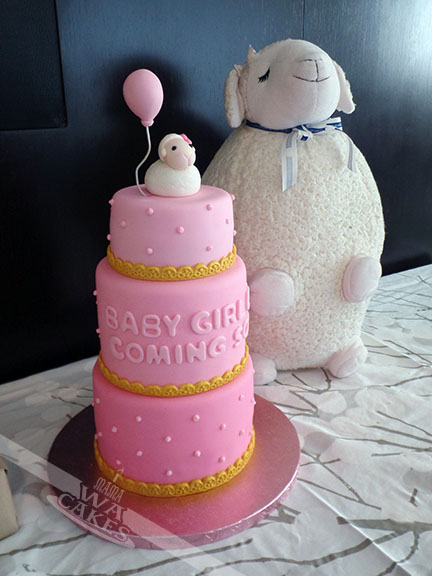
 There is nothing cuter in this world than a baby lamb cake. Except for a pink ombre, baby lamb cake! The gradation of colors gave this simple and chic cake depth, and leads your eyes up the tall cake to where the little guy sits. I mixed three different shades of pink, covering the bottom cake in the darkest, and the lightest on top. All three cakes were stacked to created an overall height of 12 inches. Each cake was then accented with molded fondant lace that I covered with gold luster dust. With same medium shade, I cut out the message for the second tier to not break up the ombre effect. I then piped little swiss dots on the rest of the cake. The cake was so pretty, but no baby shower cake can be complete without an extra dose of cuteness. The star of cake was the fondant lamb and gumpaste balloon topper... this has got to the most adorable thing I've made so far! She was shaped out of two balls of fondant... the body was an oval and the head was more of a teardrop. For the fleece, I used a large round tip and made overlapping impressions all over the body. This method was simple and very effective. I used the same method for the small cap of fleece on her head, and accented it with a small pink flower. The ears were small teardrops of fondant, while the eyes were small black sugar pearls. I used a veining tool for her nose and mouth, and completed the look with a touch of pink luster dust for some rosiness. What do you think?!
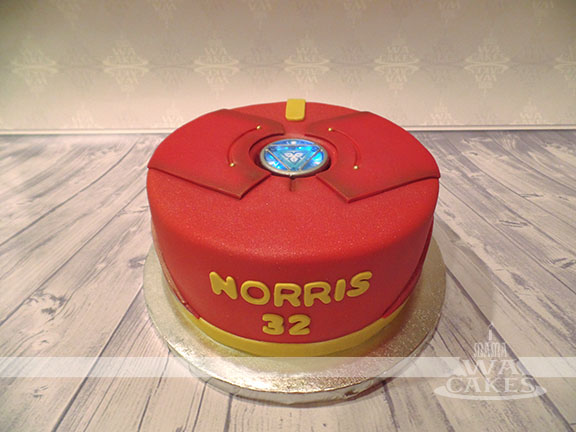
Iron Man Arc Reactor Cake
This cake was made for my awesome hairstylist, Norris. He has been perfecting my son's hair and of myself for the past 3 years, and when he mentioned his birthday... I couldn't help myself :) He mentioned a few times that he liked Iron Man so I thought that was a good place to start. He didn't want anything too complicated or too big, but I didn't want to give him anything too boring. I narrowed it down to making a cake based on the Arc Reactor in his chest... again, nothing boring. I then turned to the internet to hunt down the wow factor, something I could use as the light in his chest. I almost gave up when every thing I found was too big for my purpose or just required lots of mechanical work. Then I stumbled across a listing... a Arc Reactor USB flash drive with LED lights! It was perfect and all I had to do was to created an indent on top of the cake for it to sit in. I baked a two layer 8 inch cake, and covered it with red fondant. Using images I found online, I created a template for the chest details, and some detailing from the sides of his torso. I added on yellow fondant accents that I brushed with gold luster dust for a nice sheen. Once all the details were attached, I went back and airbrushed the edges with some copper to give some depth, and the overall cake with a nice metallic sheen. The final touch was the LED flash drive that I tightly in plastic wrap. All I had to do was turn it on, and the light show began! You can check it out below!
Thanks everyone for checking out this lengthy post, and I know I might have left out some details... please feel free to ask questions if you want to know how I did something. I hope you enjoyed these!
Subscribe to:
Posts (Atom)




Social Icons